Life After
Game Introduction


Hot Strategy
Upcoming Sales After the 2025 Steam Spring Sale: An Overview
For the vast number of PC players, Steam's annual major sales events have long been a familiar "festival." These events typically last for several weeks, bringing significant discounts on a large number of games, allowing players to fully enjoy the pleasure of shopping. So what discounts are there after this year's Steam Spring Sale? In between these major sales, Steam cleverly arranges various small game festivals, continuously creating a joyful atmosphere for players. Let's take a look.

【biubiu Accelerator】Download the Latest Version
》》》》》#biubiu Accelerator#《《《《《
This Spring Sale will end on March 21, and starting from March 24, the "City Building and Colony Simulation Game Festival" will kick off, offering special deals for those who love strategy building. Following that, various themed game festivals such as push-box, war, and creature collection will also be held in succession, catering to your diverse gaming needs.

During the promotional period, many games will see new discounts, and may even set new historical lows. To ensure that players can enjoy these discounts while also having a smooth gaming experience, the role of biubiu Accelerator cannot be overlooked. It effectively optimizes network connections, reduces latency, and allows you to play smoothly in all kinds of games.
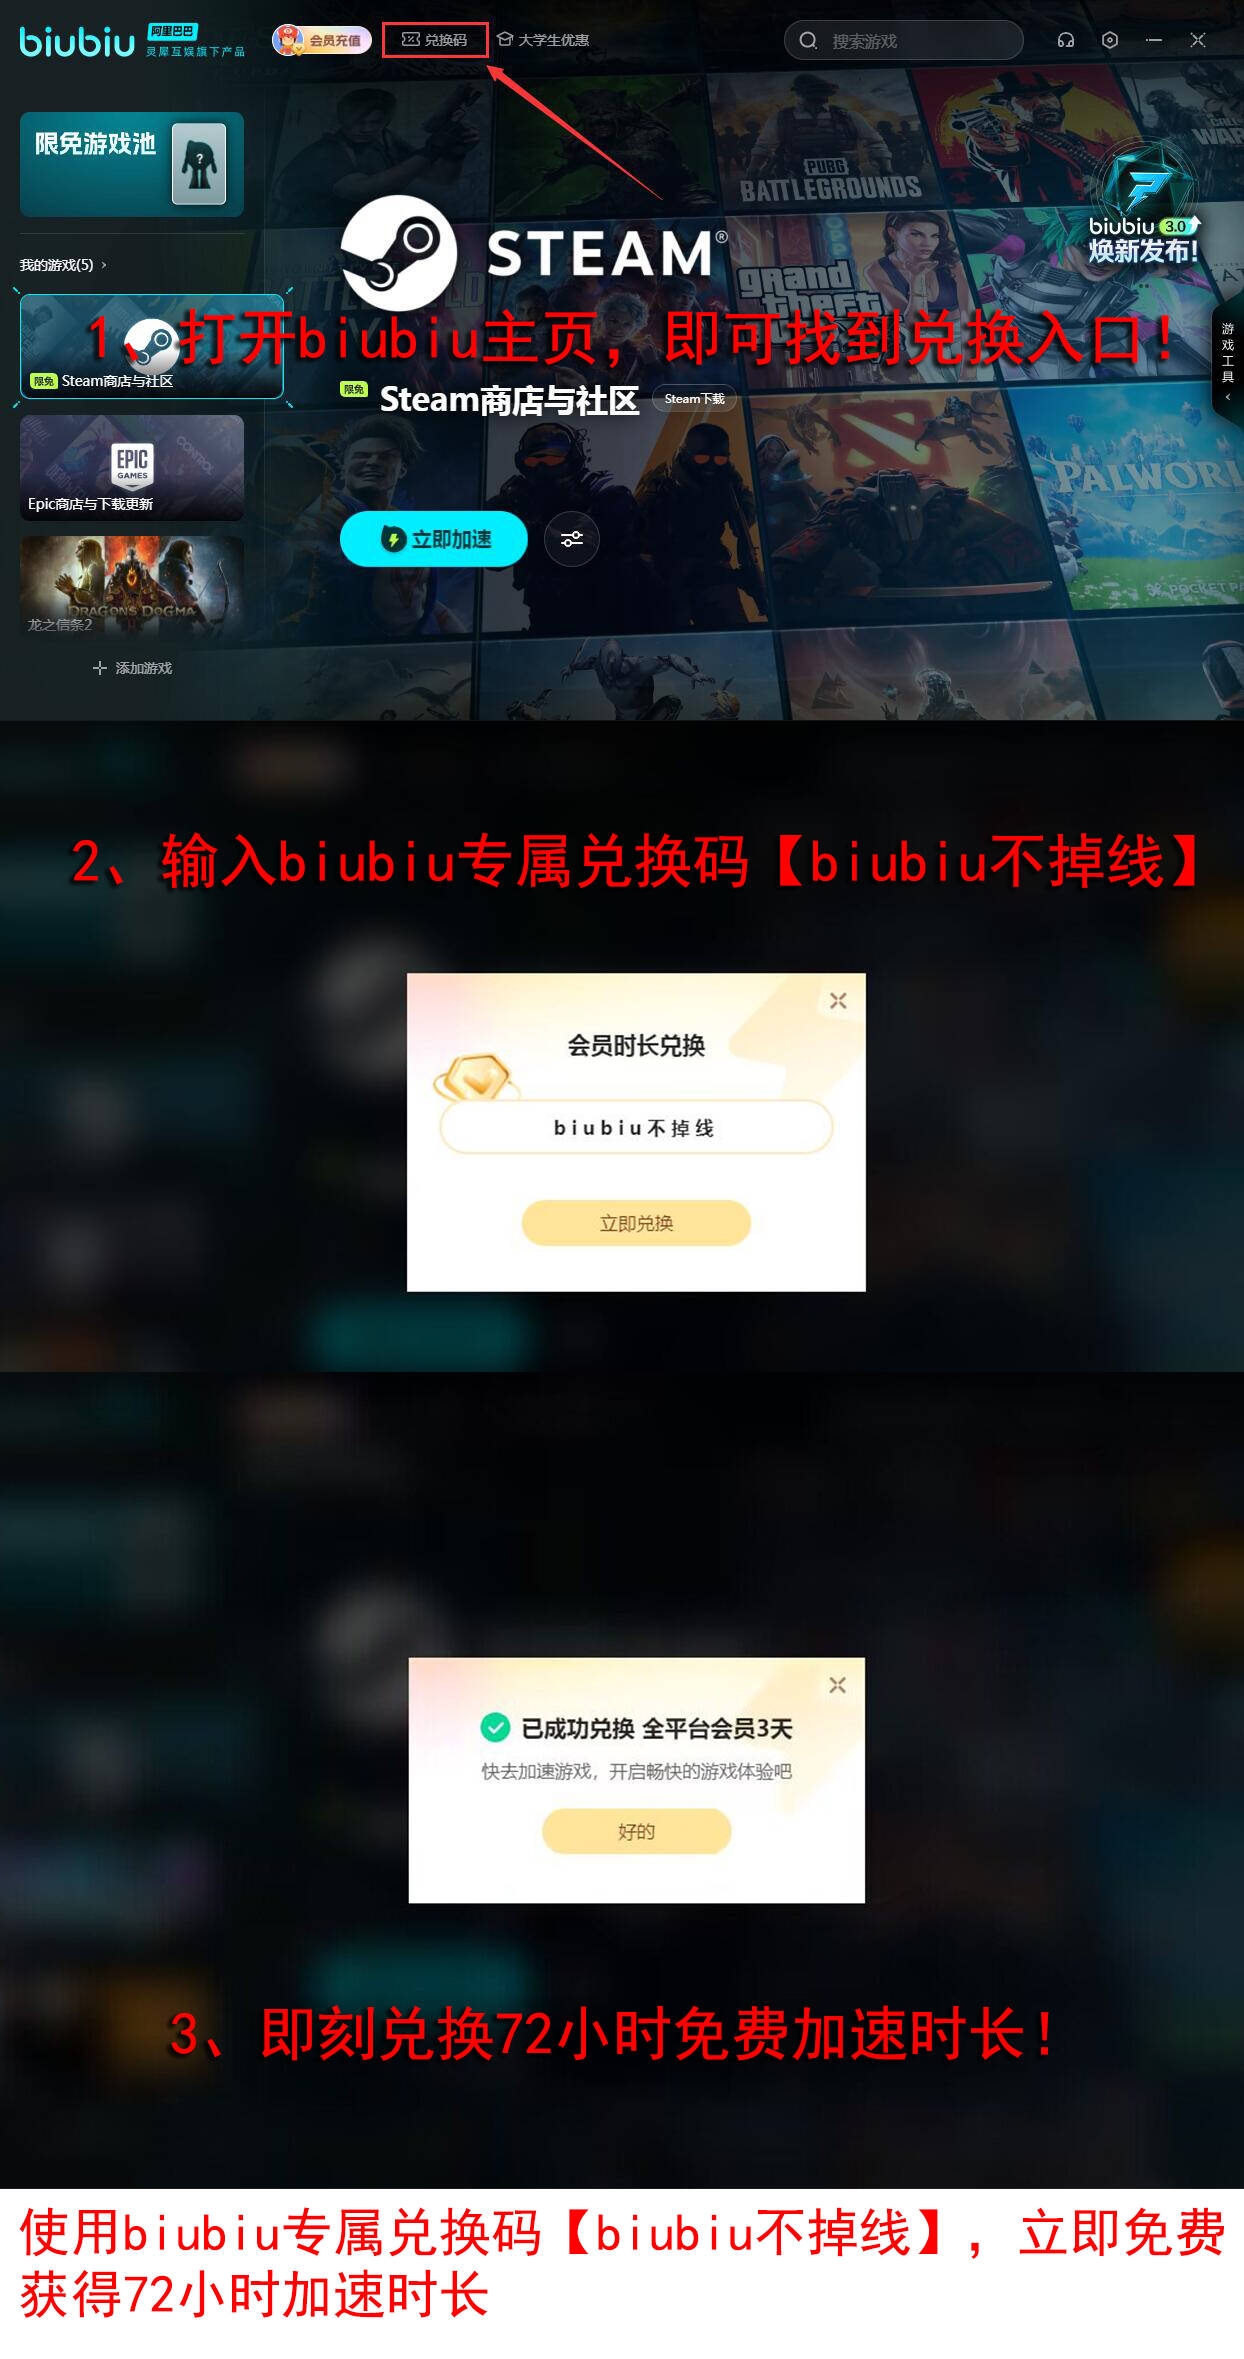
You can also claim 【biubiu No Downtime】to get three days of duration, and new logins and registrations come with an additional 3 hours of trial time, totaling up to 75 hours for free.
Next, keep an eye on the New Releases Festival in June and the Summer Sale, as well as the subsequent Autumn Sale and Scream Game Festival, which are all relatively large-scale discount events. Some amazing deals appear during these times, so it’s always worth checking out. Whether you're after thrilling shooting games or prefer leisurely fishing simulations, you can find your favorite titles at discounted prices during these events.
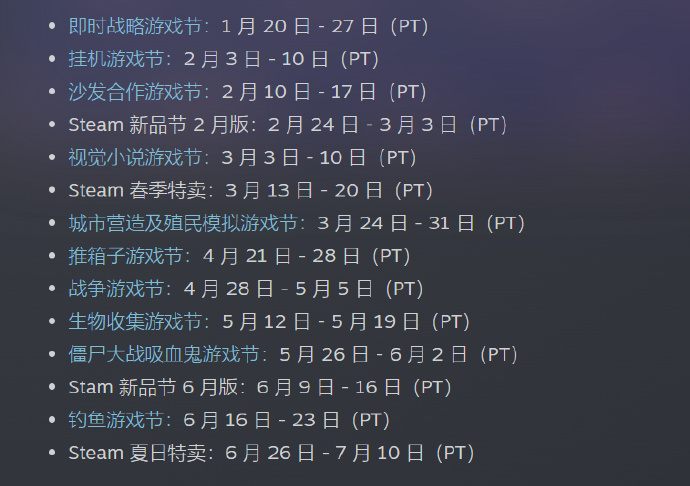
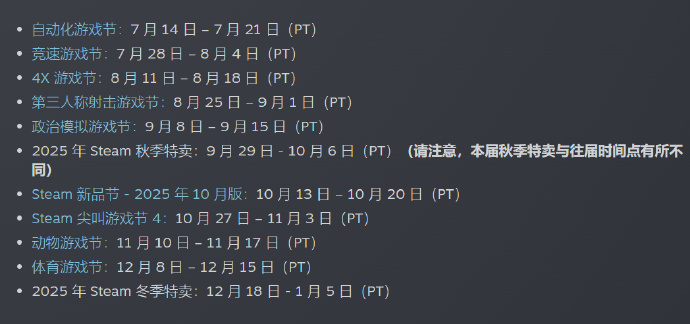
In summary, even if you missed the Steam Spring Sale, your gaming journey is just beginning. You can save the schedule of this year's events for easy reference. Also, note that the time zone PT shown in the images is not Beijing Time. Finally, keep an eye on the latest promotional activities reported by our site and use the biubiu acceleration software to safeguard your gaming experience!
Introduction to the联动活动 between "Life After" and "Fei Ren Zai" What are the联动活动 between "Life After" and "Fei Ren Zai"? (Note: The term "联动活动" is directly translated as "联动活动" in the English sentence because it's a specific term that may not have a direct equivalent in English without more context. A more natural translation, assuming "联动活动" means "collaborative event" or "crossover event", would be: Introduction to the collaborative event between "Life After" and "Fei Ren Zai". What are the collaborative events between "Life After" and "Fei Ren Zai"? ) To strictly follow your instruction, here is the direct translation without notes: Introduction to the联动活动 between "Life After" and "Fei Ren Zai" What are the联动活动 between "Life After" and "Fei Ren Zai"?
Dear survivors, have you ever thought about traveling to the heavens to experience the life of gods and monsters? The collaboration event between LifeAfter and Non-human will kick off on March 13th, bringing a series of exciting activities and generous rewards. Today, I'll introduce you to the LifeAfter and Non-human collaboration event. This event will run from March 13th to April 9th, with a wide variety of content that you definitely don't want to miss.

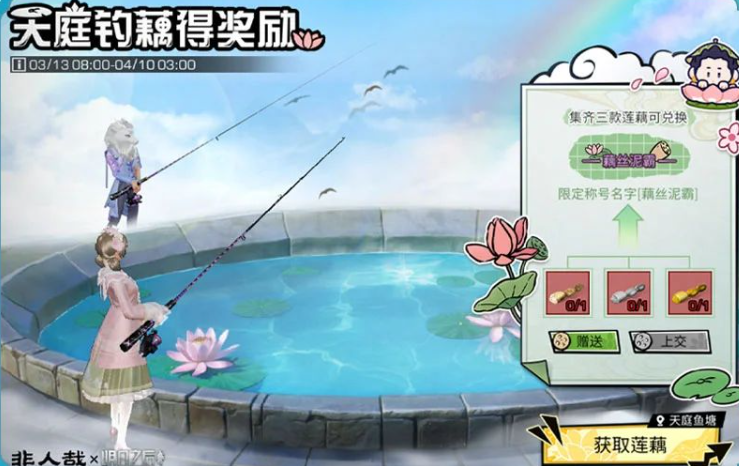
Are you also curious about what surprises this collaboration has in store? Let's go through all the activity content together and see which activities can get you unique rewards. First, let's talk about the "Lotus Pond Fishing" activity. You'll be by the lotus pond in the heavens, picking up your fishing rod, and start catching magical lotus roots! These are not ordinary lotus roots; they come in three qualities: golden, silver, and regular. After catching these lotus roots, you can use them to cook various delicious dishes, and if you collect all three qualities, you can exchange them for an ultra-cool exclusive title. Want to become the "Lotus Pond Fishing God"? Get your fishing rod ready, the pond in the heavens is waiting for you to take on the challenge!

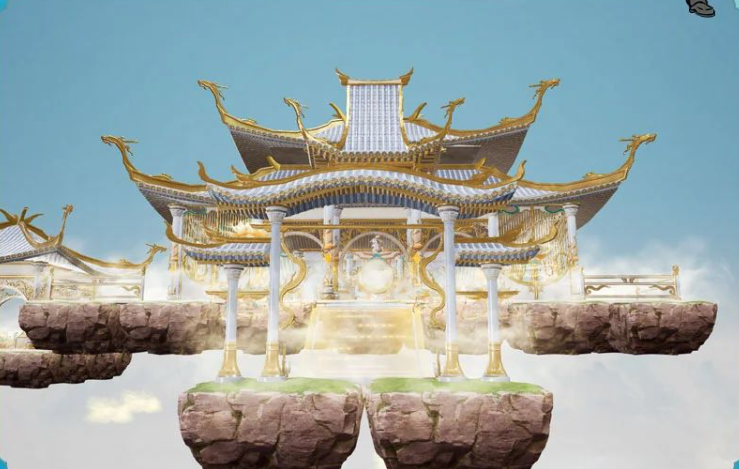
Speaking of the "Jump to the Heavens" activity, can't you help but imagine yourself stepping onto the stairs of the heavens and feeling like you're in a fairyland? The key to this activity is the legendary "Path to Heaven," where you can choose two different paths to begin your journey. No matter which path you choose, you'll receive a limited-time heaven gift pack and a large amount of growth materials. Take this opportunity to upgrade your equipment!
Have you heard of the "Great Sage Elixir"? This elixir is a secret weapon of the heavens, with magical energy that can keep you full of vitality and energy for a whole day! Every day, head to the bar in the heavens to pick up this supply, which will definitely make your adventures in the wasteland smoother. And, this supply is only available for a limited time, so don't miss out, grab it now.

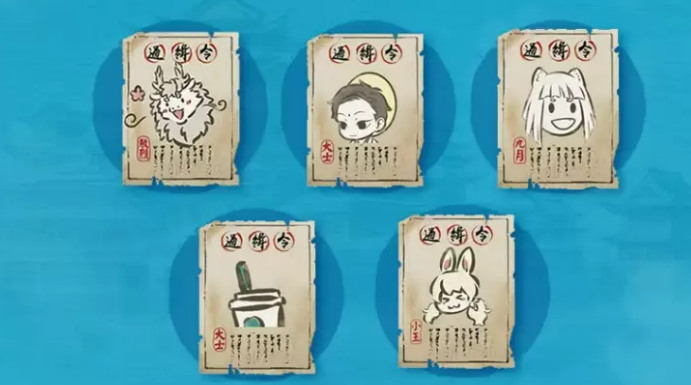
Xingtian has always been troubled, feeling that he lacks a handsome face, and has a desire to live with a proper head and face. Well, this event is the perfect chance to fulfill his dream! In the "Xingtian Face Painting" activity, you can create a handsome face for Xingtian with your own hands. After completing the task, you can also get a collaboration-limited furniture item - the Xingtian figurine! Let Xingtian always follow you and become the guardian of your home.

Talking about "Take a Break," it's definitely a perk for survivors who love easy gameplay! Each week, you will have one day to slack off and still receive all the daily rewards without doing any tasks. This is a tailor-made event for the lazy, allowing you to relax and also get a new limited action - Off Work Time. But don't think slacking off means no rewards; after completing the task, you can also get collaboration-limited graffiti and appearances! Why not form an investigation team with your friends and embark on a wasteland adventure?

That's all for the introduction to the LifeAfter and Non-human collaboration event. This collaboration not only brings a wealth of gameplay and rewards but also more fun. Each activity is filled with creativity and surprises. Don't miss out on these limited rewards, act now, and join your friends in the wonderful adventure in the heavens!
What are the contents of the Tomorrow After Tomorrow and Non-human collaboration? A detailed explanation of the Tomorrow After Tomorrow and Non-human collaboration event. Note: The translation for "明日之后" (Ming Ri Zhi Hou) is a bit tricky as it's the name of a game, and it's officially known in English as "LifeAfter". Also, "非人哉" (Fei Ren Zai) is a Chinese webcomic, which might not have an official English title but can be translated as "Non-human". If we were to use the official names, the sentence would be: What are the contents of the LifeAfter and Non-human collaboration? A detailed explanation of the LifeAfter and Non-human collaboration event.
What are the联动内容 (collaboration contents) of Tomorrow After and Fei Ren Zai? The collaboration event between Tomorrow After and Fei Ren Zai is set to officially launch on March 13th. After the event starts, survivors can go to the Heavenly Court, not only experiencing the unique lifestyle of gods and monsters but also receiving various rewards. Everyone wants to learn about the specific details of the event in advance. Below is a summary, providing detailed introductions one by one.

The overall event can be participated in from March 13th to April 9th. 1. Lotus Root Fishing Activity: You can go to the pond in the Heavenly Court where lotus roots are planted for fishing. There's a chance to obtain the new ingredient, lotus root. You might catch golden lotus root, silver lotus root, or regular lotus root. Collecting all three qualities of lotus root allows you to exchange for an exclusive title, and you can also cook lotus root dishes.
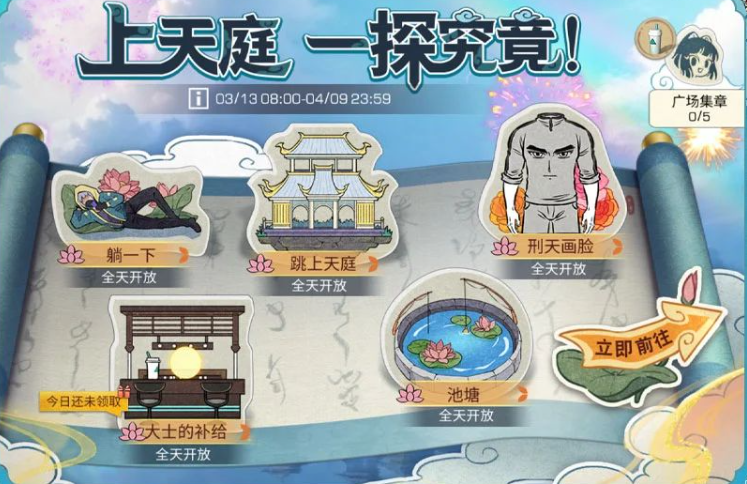
2. "Jump to the Heavenly Court" Activity: Head to the legendary path to heaven, and you will ascend to the Heavenly Court. Choose any of the two paths to heaven, and receive limited-time Heavenly Court gift packs and many cultivation materials as rewards. 3. "Bodhisattva's Supply" Activity: During the event period, visit the bar in the Heavenly Court daily to obtain the new dish: Bodhisattva's Divine Water Supply. Drinking it will start your day full of energy.
4. "Xingtian Face Painting" Activity: Xingtian has always wished for a handsome face, to live a life with "head and face." In this activity, you can try practicing making a handsome face for Xingtian. Here, you can obtain limited-time furniture, the Xingtian ornament, as part of the collaboration.
5. "Take a Break" Liver Protection Welfare Activity: Survivors can "slack off" for one day each week, without doing tasks and still receive all the daily schedule rewards for that day. Additionally, they can claim a new limited single-player action: Off Work Time. Completing the event tasks also allows you to receive limited graffiti and limited appearance items from the collaboration. You can also form investigation teams to embark on wasteland adventures.

The specific contents of the Tomorrow After and Fei Ren Zai collaboration have been fully introduced here. The activities are quite rich, each one very interesting, and the rewards within the activities are exceptionally abundant. After all, these are collaboration rewards, which cannot be obtained again if missed. Friends who are interested should not miss this event.
How to Clear the Life Form Evolution Research Institute in Seven Days World: A Guide to Clearing the Life Form Evolution Research Institute
In "The Seven Day World," the Life Form Evolution Research Institute is a relatively complex dungeon, filled with unique mechanisms and challenges. How to clear the Life Form Evolution Research Institute in The Seven Day World? Many players often get stuck after entering because they are unfamiliar with the dungeon's process, leading to low efficiency or even team wipes. Therefore, mastering the core mechanisms of the dungeon, reasonable division of labor, and adjusting combat strategies according to the attributes of the monsters are key to successfully clearing it. This article will provide a detailed analysis of how to clear this dungeon, helping players complete the challenge more efficiently and obtain generous rewards.

Upon entering the first stage of the dungeon, players will find multiple special containers within the area, which often affect the battle progress. For example, in certain areas, vats can release special energy that affects the state of nearby monsters. Players need to stand near the corresponding energy vat and attack monsters that match the vat's attribute; otherwise, the monsters will become harder to kill, or may not be properly contained. This mechanism recurs throughout the dungeon, so becoming familiar with its operation early on will greatly help with later stages. Additionally, any monsters that survive this stage might respawn in subsequent rooms, so try to avoid missing any to prevent unnecessary complications.
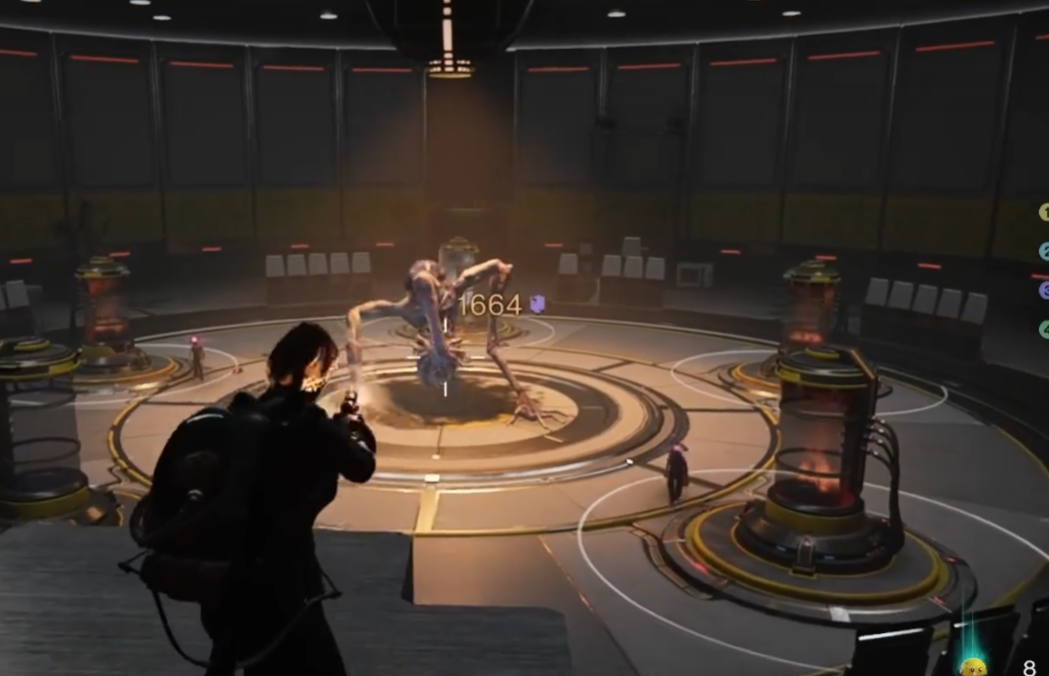
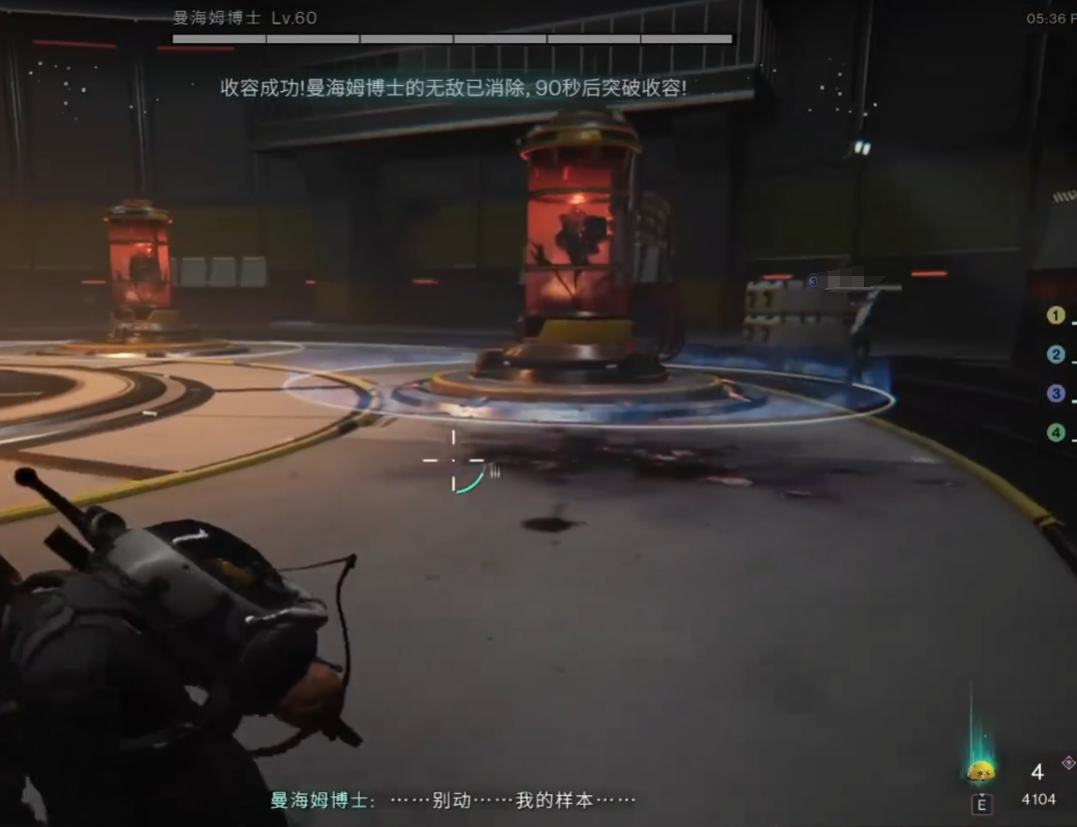
The core of the second stage's combat lies in dealing with monsters of different attributes. Players need to quickly determine the characteristics of the monsters and stand near the correct vat to attack. For instance, monsters with red energy effects might be fire-attribute, while those with blue effects are ice-attribute, and only attacks of the corresponding attribute can deal effective damage. During this process, pay attention to positioning to avoid accidentally harming the monsters your teammates are attacking, as this could affect the team's containment progress. Additionally, some monsters enter a brief invulnerable state when their health drops to a certain level, requiring the team to coordinate and wait for the monster to reveal its weakness again before attacking. The key idea of this stage is teamwork, as going solo can significantly slow down the pace and even lead to mission failure.
The third stage emphasizes players' movement and survival skills. When passing through specific areas, use gliding techniques to avoid falling and prevent unnecessary sanity loss. It is recommended to prepare items that can temporarily stabilize sanity, such as specific beverages, before entering this stage to ensure you do not run out of sanity during the battle. In this stage, enemies will attack from all directions, including aerial assaults, so always stay alert. Meanwhile, players need to collect special items in the area and use them to destroy specific blocking devices to advance further. Planning the route carefully and avoiding unnecessary battles can make this stage easier.
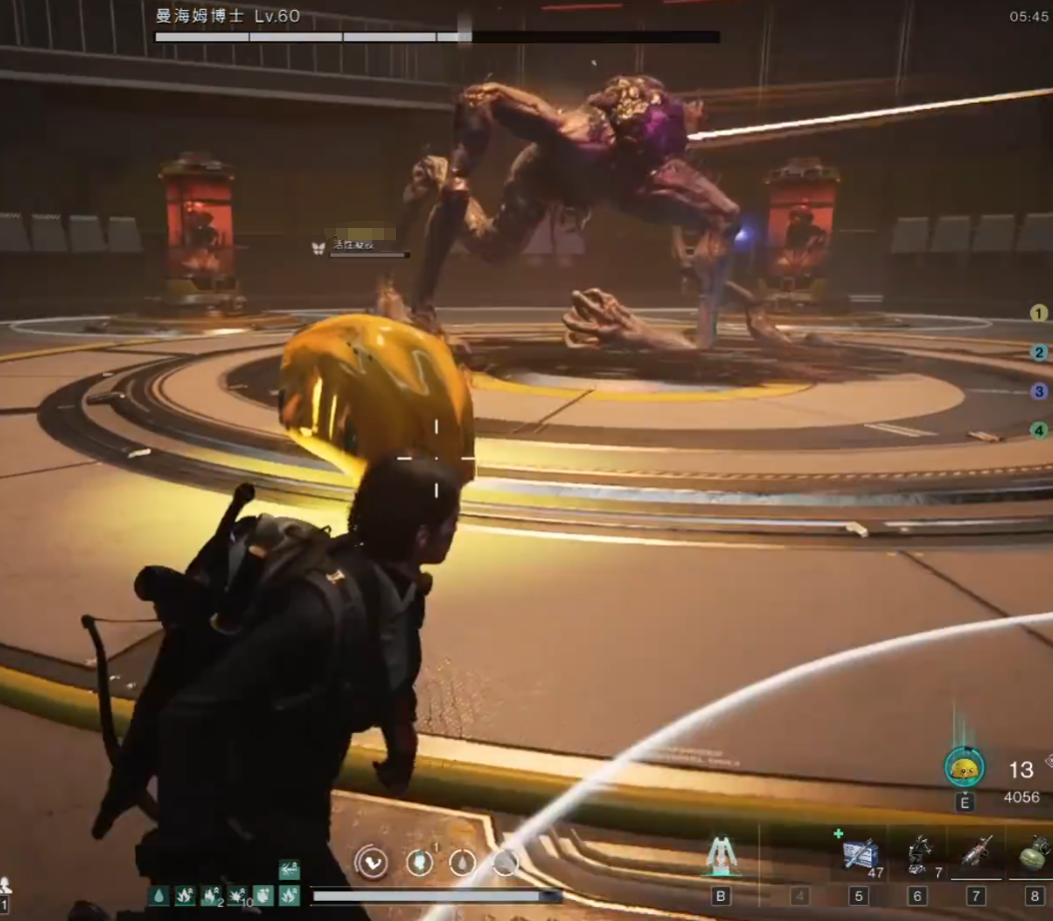
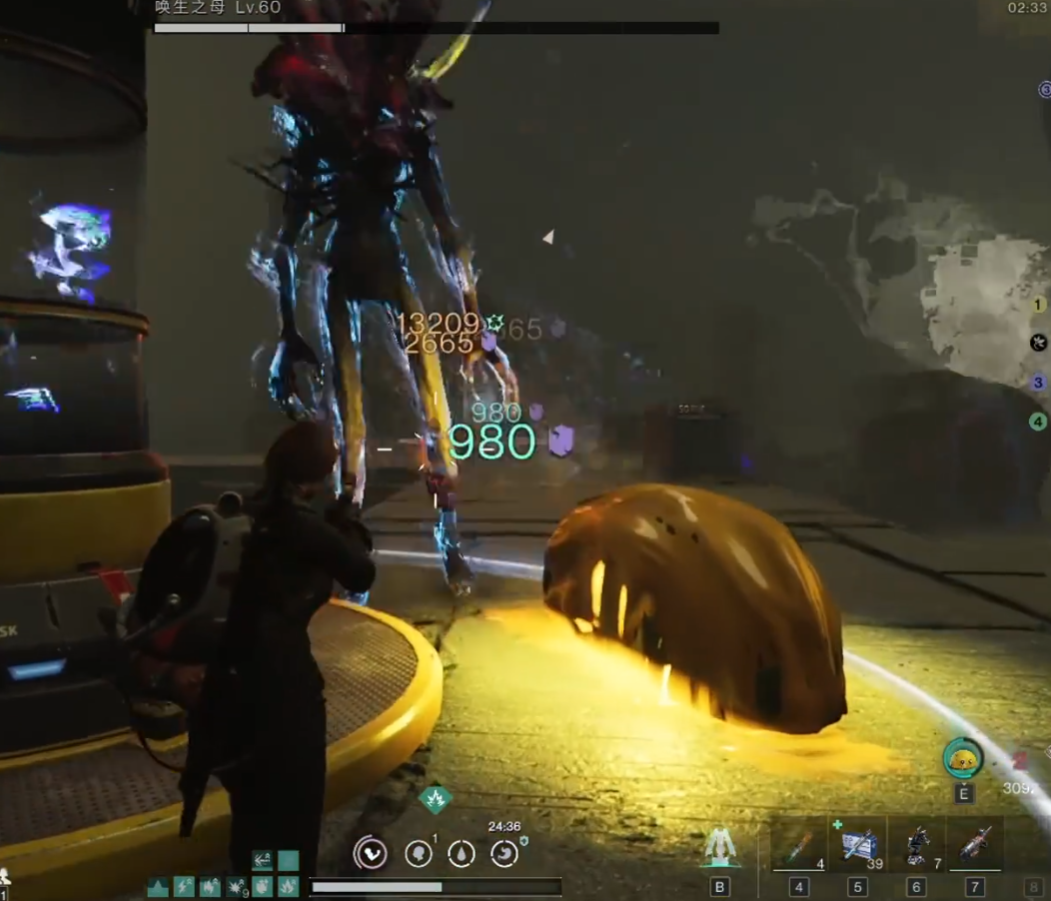
The fourth stage is the final challenge of the dungeon, featuring the boss "Mother of Awakening," who has a fairly complex combat mechanism. During the fight, she constantly summons new monsters and enters a special state when her health drops to a certain level, rendering normal attacks ineffective. At this point, players need to collect energy cores in the area and insert them into specific devices to remove the boss's invulnerability. This process requires close teamwork to ensure the energy cores are delivered to the target location in time. Meanwhile, the boss also releases large-scale elemental attacks, with the most dangerous being the full-coverage icy rain, which players need to dodge by rolling, or they might be frozen for a long time, affecting the overall output rhythm. Throughout the battle, finding a balance between controlling monsters, handling mechanisms, and damaging the boss is key to defeating her.
In summary, the core of clearing the Life Form Evolution Research Institute dungeon lies in understanding the mechanisms, reasonable division of labor, and flexible response to unexpected situations. From the initial stage of containing energy vats, to matching attacks with monsters, to gliding and solving puzzles, up to the final boss battle, each step tests the players' teamwork. To clear the dungeon efficiently, it is recommended to communicate roles with your teammates in advance to ensure that each stage's tasks are executed effectively. Additionally, choose weapons and equipment wisely, and bring weapons that can handle different elemental attributes to defeat enemies faster. By mastering the key points of the dungeon, all players should be able to complete the challenge and receive generous rewards.
Sing and Dance Star Plan Life Side Quest Trigger Guide
How to trigger the "When They Have Life" side quest in Singing Star Project? In the game "Singing Star Project", which is full of music and dance elements, players can not only enjoy the collision of rhythm and melody but also experience rich plots and missions. Among them, the "When They Have Life" side quest, with its unique storyline and interactive experience, has become a key point for many players to explore. Below are detailed instructions on how to trigger and complete this side quest, helping players better integrate into the game world.

To start the "When They Have Life" side quest, players need to first complete a series of prerequisite tasks called "When They Have Life" in the town of the game. There are quite a few of these tasks, but they are relatively easy, usually taking only a few minutes to complete. The tasks include interacting with the townspeople, solving simple problems, or completing mini-games, etc.
After completing these prerequisite tasks, players will receive Atif's note, this note is very important and needs to be kept safe. Atif's note is not just an ordinary item; it is a crucial clue linking the past and the future. After obtaining the note, players need to read its contents carefully to better understand the goals and background of the subsequent tasks.

After obtaining the note, you need to return to the Fairy Island, where players will discover a new side quest, "Back to the Future." At this point, players need to click to accept the task, and the mission will officially begin. As an important location in the game, the Fairy Island is filled with mysterious and fantastical elements, offering players a completely different adventure from the town.
The core of the "Back to the Future" task lies in exploring the connection between the past and the future. Players need to gradually uncover the secrets behind Atif's note through a series of tasks and challenges. These tasks may involve solving puzzles or interacting with other characters, requiring players to use their wisdom and skills to successfully complete these tasks, thereby revealing the meaningful side story.

After completing the "Back to the Future" task, players will receive generous rewards, including in-game currency, items, and unique outfits, etc. These rewards not only recognize the player's efforts but also provide assistance for their further progress in the game. Additionally, after completing the task, players will unlock more plotlines and missions, allowing them to delve deeper into the exciting world of "Singing Star Project."

The above is an introduction to the "When They Have Life" side quest in Singing Star Project, players can not only experience the rich content of the game but also feel the emotional resonance brought by the plot. It is hoped that this guide will help players better trigger and complete this side quest, enjoying the fun the game brings.
Recommend


Strategy
How to Play the Vigilante Hero in Romance of the Three Kingdoms Fantasy Continent 2: Ballad of the Warlord - Strategy Guide for Playing the Vigilante Hero in Three Fantasies 2: Ballad of the Warlord
What is the action order for "The Ballad of the Warhawk" in Fantasy Three Kingdoms 2? A strategy guide for the action order in The Ballad of the Warhawk in Fantasy Three Kingdoms 2
How is Viola in Black Beacon? Analysis of Viola's Strength in Black Beacon
When will the mobile game "Douluo Continent Soul Hunting World" be released? Introduction to the public testing time of "Douluo Continent Soul Hunting World" mobile game.
When will Dragon Stone War be released? Overview of Dragon Stone War public testing time
How to Play Modern Warships Horizon Detailed Explanation of Modern Warships Horizon Configuration